#前言
本文的内容大多数翻译于bentrevett / pytorch-seq2seq , 在本文中我们实现了Attention is All You Need 文章中的transformer模型,在该模型的基础上我们做了轻微的改动。 本文主要是介绍用代码来实现transformer,不对transformer做详细的介绍。更多关于transformer的信息,大家可以参考这三篇文章(💝 一 💝,💝 二 💝,💝 三 💝) ,也可以看我的💝 上一篇文章 💝。
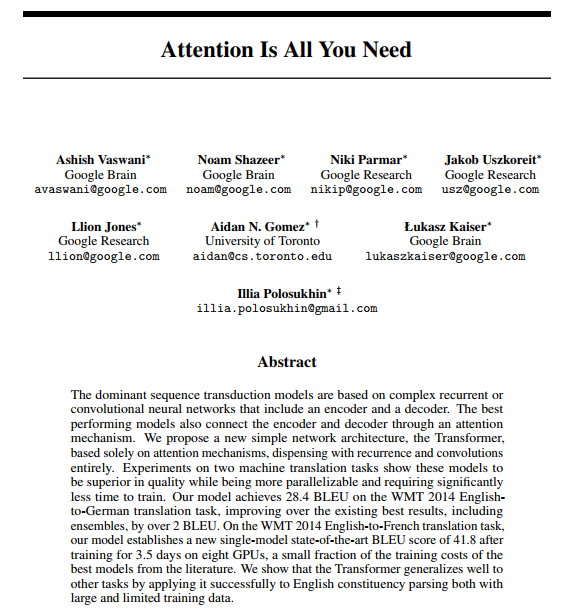
下面是 Attention is All You Need 论文的一个截图。
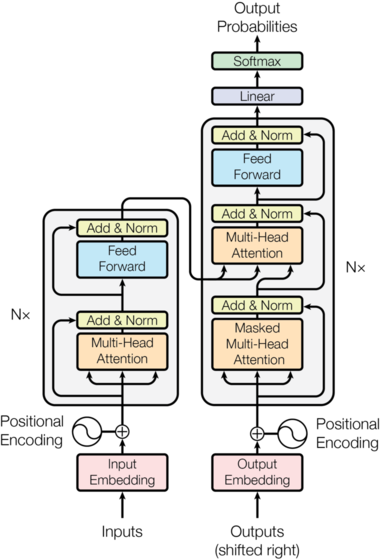
这下面是 transformer 的大概结构
简介
与使用卷积网络来进行 Sequence-to-Sequence 计算类似,transformer也没有使用循环神经网络。而且它也没有用到任何的卷积层,取而代之的是它全部使用线性层,注意力机制和归一化操作。 截至2020年1月,Transformer是NPL领域中的主要网络结构,并且人们使用它在多个任务中都达到了 state-of-the-art 的结果,而且看起来它会是最近未来的一个趋势。
其中最受欢迎的Transformer变体当属 💝 BERT 💝 (Bidirectional Encoder Representations from Transformers) ,预训练版本的BERT被广泛的应用到NPL模型的网络中来替换embedding层。
现在网上有一个来处理预训练transformer的通用库💝 Transformers 💝 ,在💝 这里 💝 可以查看所有的预训练模型。
本文其实与论文 Attention is All You Need 中介绍的transformer有一点点不一样,为如下几点:
- 论文中使用的是静态的位置编码,而本文使用的是可学习的动态的位置编码。
- 论文中的优化函数中的学习率使用的是warm-up 和分阶段 cool-down的方法,而本文使用的是静态的学习率,而且我们使用的是标准的Adam优化器。
- 我们没有使用label smoothing方法。
我们的这些改变使得我们的代码的更加接近于BERT和大多数Transformer变种的设置。
预处理数据
首先我们导入必要的库,和做一些常用的设置
import torch
import torch.nn as nn
import torch.optim as optim

import torchtext
from torchtext.datasets import Multi30k
from torchtext.data import Field, BucketIterator

import matplotlib.pyplot as plt
import matplotlib.ticker as ticker

import spacy
import numpy as np

import random
import math
import time

SEED = 1234

random.seed(SEED)
np.random.seed(SEED)
torch.manual_seed(SEED)
torch.cuda.manual_seed(SEED)
torch.backends.cudnn.deterministic = True
然后我们加载数据集和一些预处理,我们这次还是来进行德语于英语的翻译任务(将德语翻译成英语)。
spacy_de = spacy.load('de_core_news_sm')
spacy_en = spacy.load('en_core_web_sm')
def tokenize_de(text):
    """
    Tokenizes German text from a string into a list of strings
    """
    return [tok.text for tok in spacy_de.tokenizer(text)]

def tokenize_en(text):
    """
    Tokenizes English text from a string into a list of strings
    """
    return [tok.text for tok in spacy_en.tokenizer(text)]

SRC = Field(tokenize = tokenize_de,
            init_token = '<sos>',
            eos_token = '<eos>',
            lower = True,
            batch_first = True)

TRG = Field(tokenize = tokenize_en,
            init_token = '<sos>',
            eos_token = '<eos>',
            lower = True,
            batch_first = True)
train_data, valid_data, test_data = Multi30k.splits(exts = ('.de', '.en'),
                                                    fields = (SRC, TRG))
SRC.build_vocab(train_data, min_freq = 2)
TRG.build_vocab(train_data, min_freq = 2)
device = torch.device('cuda' if torch.cuda.is_available() else 'cpu')
BATCH_SIZE = 128

train_iterator, valid_iterator, test_iterator = BucketIterator.splits(
    (train_data, valid_data, test_data),
     batch_size = BATCH_SIZE,
     device = device)
其中<sos>和<eos>分别指的是开始和结束符。我们将数据集分成训练集(train_data),验证集(valid_data),和测试集(test_data)。其中验证集是用来在训练的时候查看模型的效果的,而测试集是在训练完成之后来检验模型的泛化能力的。
模型构建
与之前介绍的翻译模型一样,transformer模型也是encoder-decoder结构,其中encoder是用来对输入的句子进行编码和提取特征,而decoder是将encoder的结果进行解码,最终的到翻译的结果。
encoder
下面是encoder的结构图,在我的💝 上一篇文章 💝 有对encoder做详细的介绍。

从图中我们可以看到,encoder包括input embedding,Positional Encoding,Multi-Head Attention,Add&Norm,Feed Forward这些结构,代码如下:
class Encoder(nn.Module):
    def __init__(self,  input_dim,  hid_dim,  n_layers,  n_heads,  pf_dim, dropout,  device, max_length = 100):
        super().__init__()

        self.device = device

        self.tok_embedding = nn.Embedding(input_dim, hid_dim)
        self.pos_embedding = nn.Embedding(max_length, hid_dim)

        self.layers = nn.ModuleList([EncoderLayer(hid_dim,  n_heads,   pf_dim, dropout, device)  for _ in range(n_layers)])

        self.dropout = nn.Dropout(dropout)

        self.scale = torch.sqrt(torch.FloatTensor([hid_dim])).to(device)

    def forward(self, src, src_mask):

        #src = [batch size, src len]
        #src_mask = [batch size, 1, 1, src len]

        batch_size = src.shape[0]
        src_len = src.shape[1]
        # 先生成一个顺序的位置编码
        pos = torch.arange(0, src_len).unsqueeze(0).repeat(batch_size, 1).to(self.device)

        #pos = [batch size, src len]
        # 进行位置编码
        src = self.dropout((self.tok_embedding(src) * self.scale) + self.pos_embedding(pos))

        #src = [batch size, src len, hid dim]

        for layer in self.layers:
            src = layer(src, src_mask)

        #src = [batch size, src len, hid dim]

        return src
EncoderLayer
接下来我们来看看EncoderLayer的代码,其中包含两个归一化层 layer_norm,一个多头注意力MultiHeadAttentionLayer和一个位置编码PositionwiseFeedforwardLayer。其中 layer_norm 简单理解就是将单个样本进行归一化处理,使得它均值为0方差为1,从而能够让模型更快的收敛,在我的这篇文章 中有关于 layer_norm 的介绍。
class EncoderLayer(nn.Module):
    def __init__(self,  hid_dim,  n_heads,  pf_dim,  dropout,  device):
        super().__init__()

        self.self_attn_layer_norm = nn.LayerNorm(hid_dim)
        self.ff_layer_norm = nn.LayerNorm(hid_dim)
        self.self_attention = MultiHeadAttentionLayer(hid_dim, n_heads, dropout, device)
        self.positionwise_feedforward = PositionwiseFeedforwardLayer(hid_dim,
                                                                     pf_dim,
                                                                     dropout)
        self.dropout = nn.Dropout(dropout)

    def forward(self, src, src_mask):

        #src = [batch size, src len, hid dim]
        #src_mask = [batch size, 1, 1, src len]

        #self attention
        _src, _ = self.self_attention(src, src, src, src_mask)

        #dropout, residual connection and layer norm
        src = self.self_attn_layer_norm(src + self.dropout(_src))

        #src = [batch size, src len, hid dim]

        #positionwise feedforward
        _src = self.positionwise_feedforward(src)

        #dropout, residual and layer norm
        src = self.ff_layer_norm(src + self.dropout(_src))

        #src = [batch size, src len, hid dim]

        return src
MultiHeadAttentionLayer
其中多头注意力机制结构如下:
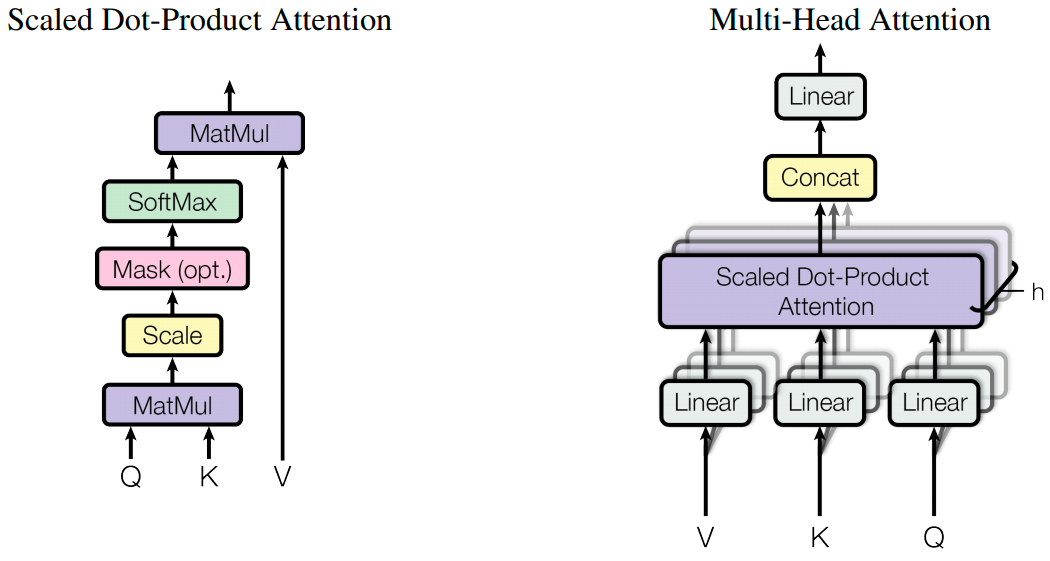
在我的💝 上一篇文章 💝 有对多头注意力机制做详细的介绍。
大概可以理解为使用多个不同的初始化参数,生成多个不同的注意力的结果,然后将他们拼接起来,然后再乘以一个参数 W 得到最终的结果,当作下一个层的输入。代码如下:
class MultiHeadAttentionLayer(nn.Module):
    def __init__(self, hid_dim, n_heads, dropout, device):
        super().__init__()

        assert hid_dim % n_heads == 0

        self.hid_dim = hid_dim
        self.n_heads = n_heads
        self.head_dim = hid_dim // n_heads

        self.fc_q = nn.Linear(hid_dim, hid_dim)
        self.fc_k = nn.Linear(hid_dim, hid_dim)
        self.fc_v = nn.Linear(hid_dim, hid_dim)

        self.fc_o = nn.Linear(hid_dim, hid_dim)

        self.dropout = nn.Dropout(dropout)

        self.scale = torch.sqrt(torch.FloatTensor([self.head_dim])).to(device)

    def forward(self, query, key, value, mask = None):

        batch_size = query.shape[0]

        #query = [batch size, query len, hid dim]
        #key = [batch size, key len, hid dim]
        #value = [batch size, value len, hid dim]
        # 在self.fc_q,self.fc_k,self.fc_v中已经包含了多头
        Q = self.fc_q(query)
        K = self.fc_k(key)
        V = self.fc_v(value)

        #Q = [batch size, query len, hid dim]
        #K = [batch size, key len, hid dim]
        #V = [batch size, value len, hid dim]
        # 将多头单独出来
        Q = Q.view(batch_size, -1, self.n_heads, self.head_dim).permute(0, 2, 1, 3)
        K = K.view(batch_size, -1, self.n_heads, self.head_dim).permute(0, 2, 1, 3)
        V = V.view(batch_size, -1, self.n_heads, self.head_dim).permute(0, 2, 1, 3)

        #Q = [batch size, n heads, query len, head dim]
        #K = [batch size, n heads, key len, head dim]
        #V = [batch size, n heads, value len, head dim]

        energy = torch.matmul(Q, K.permute(0, 1, 3, 2)) / self.scale

        #energy = [batch size, n heads, query len, key len]

        if mask is not None:
            energy = energy.masked_fill(mask == 0, -1e10)

        attention = torch.softmax(energy, dim = -1)

        #attention = [batch size, n heads, query len, key len]

        x = torch.matmul(self.dropout(attention), V)

        #x = [batch size, n heads, query len, head dim]

        x = x.permute(0, 2, 1, 3).contiguous()

        #x = [batch size, query len, n heads, head dim]

        x = x.view(batch_size, -1, self.hid_dim)

        #x = [batch size, query len, hid dim]

        x = self.fc_o(x)

        #x = [batch size, query len, hid dim]

        return x, attention
从代码中我们可以看到,Q,K,V都是通过将输入放入一个全连接层得到的输出,而且在Q,K,V的处理中是将多头放在一起处理的,后面再将他们分开。
PositionwiseFeedforwardLayer
接下来我们来看看PositionwiseFeedforwardLayer的实现,可以看到该位置编码就是两个全连接
class PositionwiseFeedforwardLayer(nn.Module):
    def __init__(self, hid_dim, pf_dim, dropout):
        super().__init__()

        self.fc_1 = nn.Linear(hid_dim, pf_dim)
        self.fc_2 = nn.Linear(pf_dim, hid_dim)

        self.dropout = nn.Dropout(dropout)

    def forward(self, x):

        #x = [batch size, seq len, hid dim]

        x = self.dropout(torch.relu(self.fc_1(x)))

        #x = [batch size, seq len, pf dim]

        x = self.fc_2(x)

        #x = [batch size, seq len, hid dim]

        return x
Decoder
decoder的结构如下图所示,decoder与encoder其实是很相似的,只是在其中的每一个decoder block中,多加了一个Masked Multi-Head Attention的残差网络,而且它的
Multi-Head Attention接收的参数不仅有从上一级传递过来的,还有从encoder中传递过来的。
decoder代码如下
class Decoder(nn.Module):
    def __init__(self,  output_dim,  hid_dim,  n_layers, n_heads,  pf_dim,  dropout,  device, max_length = 100):
        super().__init__()

        self.device = device

        self.tok_embedding = nn.Embedding(output_dim, hid_dim)
        self.pos_embedding = nn.Embedding(max_length, hid_dim)

        self.layers = nn.ModuleList([DecoderLayer(hid_dim,  n_heads,  pf_dim,  dropout,  device) for _ in range(n_layers)])

        self.fc_out = nn.Linear(hid_dim, output_dim)

        self.dropout = nn.Dropout(dropout)

        self.scale = torch.sqrt(torch.FloatTensor([hid_dim])).to(device)

    def forward(self, trg, enc_src, trg_mask, src_mask):

        #trg = [batch size, trg len]
        #enc_src = [batch size, src len, hid dim]
        #trg_mask = [batch size, 1, trg len, trg len]
        #src_mask = [batch size, 1, 1, src len]

        batch_size = trg.shape[0]
        trg_len = trg.shape[1]

        pos = torch.arange(0, trg_len).unsqueeze(0).repeat(batch_size, 1).to(self.device)

        #pos = [batch size, trg len]

        trg = self.dropout((self.tok_embedding(trg) * self.scale) + self.pos_embedding(pos))

        #trg = [batch size, trg len, hid dim]

        for layer in self.layers:
            trg, attention = layer(trg, enc_src, trg_mask, src_mask)

        #trg = [batch size, trg len, hid dim]
        #attention = [batch size, n heads, trg len, src len]

        output = self.fc_out(trg)

        #output = [batch size, trg len, output dim]

        return output, attention
Decoder Layer
下面是 Decoder Layer 的代码,基本上跟 encoder layer 一样,只是做了稍微的改动。
class DecoderLayer(nn.Module):
    def __init__(self,  hid_dim,  n_heads,  pf_dim,  dropout,  device):
        super().__init__()

        self.self_attn_layer_norm = nn.LayerNorm(hid_dim)
        self.enc_attn_layer_norm = nn.LayerNorm(hid_dim)
        self.ff_layer_norm = nn.LayerNorm(hid_dim)
        self.self_attention = MultiHeadAttentionLayer(hid_dim, n_heads, dropout, device)
        self.encoder_attention = MultiHeadAttentionLayer(hid_dim, n_heads, dropout, device)
        self.positionwise_feedforward = PositionwiseFeedforwardLayer(hid_dim,  pf_dim,  dropout)
        self.dropout = nn.Dropout(dropout)

    def forward(self, trg, enc_src, trg_mask, src_mask):

        #trg = [batch size, trg len, hid dim]
        #enc_src = [batch size, src len, hid dim]
        #trg_mask = [batch size, 1, trg len, trg len]
        #src_mask = [batch size, 1, 1, src len]

        #self attention
        _trg, _ = self.self_attention(trg, trg, trg, trg_mask)

        #dropout, residual connection and layer norm
        trg = self.self_attn_layer_norm(trg + self.dropout(_trg))

        #trg = [batch size, trg len, hid dim]

        #encoder attention
        _trg, attention = self.encoder_attention(trg, enc_src, enc_src, src_mask)

        #dropout, residual connection and layer norm
        trg = self.enc_attn_layer_norm(trg + self.dropout(_trg))

        #trg = [batch size, trg len, hid dim]

        #positionwise feedforward
        _trg = self.positionwise_feedforward(trg)

        #dropout, residual and layer norm
        trg = self.ff_layer_norm(trg + self.dropout(_trg))

        #trg = [batch size, trg len, hid dim]
        #attention = [batch size, n heads, trg len, src len]

        return trg, attention
代码中我们可以看到,有两个mask,分别是trg_mask和 src_mask,在我的💝 上一篇文章 💝 中在介绍如何提升准确率的时候有提到过一次mask,该mask主要是在进行attention的时候,过滤掉pading的地方。 不过其中的mask与这里的trg_mask和 src_mask有点不一样,思想差不多,但是实现方式不一样。在Seq2Seq代码,里面有关于mask的实现。
Seq2Seq
class Seq2Seq(nn.Module):
    def __init__(self,  encoder, decoder,  src_pad_idx, trg_pad_idx, device):
        super().__init__()

        self.encoder = encoder
        self.decoder = decoder
        self.src_pad_idx = src_pad_idx
        self.trg_pad_idx = trg_pad_idx
        self.device = device

    def make_src_mask(self, src):

        #src = [batch size, src len]

        src_mask = (src != self.src_pad_idx).unsqueeze(1).unsqueeze(2)

        #src_mask = [batch size, 1, 1, src len]

        return src_mask

    def make_trg_mask(self, trg):

        #trg = [batch size, trg len]

        trg_pad_mask = (trg != self.trg_pad_idx).unsqueeze(1).unsqueeze(2)

        #trg_pad_mask = [batch size, 1, 1, trg len]

        trg_len = trg.shape[1]

        trg_sub_mask = torch.tril(torch.ones((trg_len, trg_len), device = self.device)).bool()

        #trg_sub_mask = [trg len, trg len]

        trg_mask = trg_pad_mask & trg_sub_mask

        #trg_mask = [batch size, 1, trg len, trg len]

        return trg_mask

    def forward(self, src, trg):

        #src = [batch size, src len]
        #trg = [batch size, trg len]

        src_mask = self.make_src_mask(src)
        trg_mask = self.make_trg_mask(trg)

        #src_mask = [batch size, 1, 1, src len]
        #trg_mask = [batch size, 1, trg len, trg len]

        enc_src = self.encoder(src, src_mask)

        #enc_src = [batch size, src len, hid dim]

        output, attention = self.decoder(trg, enc_src, trg_mask, src_mask)

        #output = [batch size, trg len, output dim]
        #attention = [batch size, n heads, trg len, src len]

        return output, attention
从代码中我们可以看到,对于 src,就是直接将非<pad>设置为true,将<pad>设置为false。 而对于trg,则不一样。 对于trg,先通过句子中单词是否为非<pad>,生成一个mask1,然后生成一个内容全为1的下三角矩阵mask2,最后将他们进行”与”运算得到最后的trg-mask。 比如trg为 [“hello”, “how”, “are”, “you”, “?”, <pad>, <pad>] 那么 mask1 就是 \(\begin{bmatrix} True & True & True & True & True & False & False \end{bmatrix}\) ,mask2就是 \(\begin{bmatrix} True & False & False & False & False & False & False \\ True & True & False & False & False & False & False \\ True & True & True & False & False & False & False \\ True & True & True & True & False & False & False \\ True & True & True & True & True & False & False \\ True & True & True & True & True & True & False \\ True & True & True & True & True & True & True \\ \end{bmatrix}\) 然后将mask1和mask2进行”与”运算,得到最终的trg-mask如下 \(\begin{bmatrix} True & False & False & False & False & False & False \\ True & True & False & False & False & False & False \\ True & True & True & False & False & False & False \\ True & True & True & True & False & False & False \\ True & True & True & True & True & False & False \\ True & True & True & True & True & False & False \\ True & True & True & True & True & False & False \\ \end{bmatrix}\)
至于为什么要这样做,我想一部分的理由是这样可以更加精细化attention,有的attention关注第一个单词,有个attention关注前两个单词,等等,这样更精细化的attention可能会提高attention的效果。
Training the Seq2Seq Model
接下来我们开始训练模型,代码如下
INPUT_DIM = len(SRC.vocab)
OUTPUT_DIM = len(TRG.vocab)
HID_DIM = 256
ENC_LAYERS = 3
DEC_LAYERS = 3
ENC_HEADS = 8
DEC_HEADS = 8
ENC_PF_DIM = 512
DEC_PF_DIM = 512
ENC_DROPOUT = 0.1
DEC_DROPOUT = 0.1

enc = Encoder(INPUT_DIM,
              HID_DIM,
              ENC_LAYERS,
              ENC_HEADS,
              ENC_PF_DIM,
              ENC_DROPOUT,
              device)

dec = Decoder(OUTPUT_DIM,
              HID_DIM,
              DEC_LAYERS,
              DEC_HEADS,
              DEC_PF_DIM,
              DEC_DROPOUT,
              device)
SRC_PAD_IDX = SRC.vocab.stoi[SRC.pad_token]
TRG_PAD_IDX = TRG.vocab.stoi[TRG.pad_token]
model = Seq2Seq(enc, dec, SRC_PAD_IDX, TRG_PAD_IDX, device).to(device)
def count_parameters(model):
    return sum(p.numel() for p in model.parameters() if p.requires_grad)

print(f'The model has {count_parameters(model):,} trainable parameters')
def initialize_weights(m):
    if hasattr(m, 'weight') and m.weight.dim() > 1:
        nn.init.xavier_uniform_(m.weight.data)
model.apply(initialize_weights);
LEARNING_RATE = 0.0005

optimizer = torch.optim.Adam(model.parameters(), lr = LEARNING_RATE)
criterion = nn.CrossEntropyLoss(ignore_index = TRG_PAD_IDX)
def train(model, iterator, optimizer, criterion, clip):

    model.train()

    epoch_loss = 0

    for i, batch in enumerate(iterator):

        src = batch.src
        trg = batch.trg

        optimizer.zero_grad()

        output, _ = model(src, trg[:,:-1])

        #output = [batch size, trg len - 1, output dim]
        #trg = [batch size, trg len]

        output_dim = output.shape[-1]

        output = output.contiguous().view(-1, output_dim)
        trg = trg[:,1:].contiguous().view(-1)

        #output = [batch size * trg len - 1, output dim]
        #trg = [batch size * trg len - 1]

        loss = criterion(output, trg)

        loss.backward()

        torch.nn.utils.clip_grad_norm_(model.parameters(), clip)

        optimizer.step()

        epoch_loss += loss.item()

    return epoch_loss / len(iterator)

def epoch_time(start_time, end_time):
    elapsed_time = end_time - start_time
    elapsed_mins = int(elapsed_time / 60)
    elapsed_secs = int(elapsed_time - (elapsed_mins * 60))
    return elapsed_mins, elapsed_secs
N_EPOCHS = 10
CLIP = 1

best_valid_loss = float('inf')

for epoch in range(N_EPOCHS):

    start_time = time.time()

    train_loss = train(model, train_iterator, optimizer, criterion, CLIP)
    valid_loss = evaluate(model, valid_iterator, criterion)

    end_time = time.time()

    epoch_mins, epoch_secs = epoch_time(start_time, end_time)

    if valid_loss < best_valid_loss:
        best_valid_loss = valid_loss
        torch.save(model.state_dict(), 'tut6-model.pt')

    print(f'Epoch: {epoch+1:02} | Time: {epoch_mins}m {epoch_secs}s')
    print(f'\tTrain Loss: {train_loss:.3f} | Train PPL: {math.exp(train_loss):7.3f}')
    print(f'\t Val. Loss: {valid_loss:.3f} |  Val. PPL: {math.exp(valid_loss):7.3f}')
接下来我们进行模型评估
def evaluate(model, iterator, criterion):

    model.eval()

    epoch_loss = 0

    with torch.no_grad():

        for i, batch in enumerate(iterator):

            src = batch.src
            trg = batch.trg

            output, _ = model(src, trg[:,:-1])

            #output = [batch size, trg len - 1, output dim]
            #trg = [batch size, trg len]

            output_dim = output.shape[-1]

            output = output.contiguous().view(-1, output_dim)
            trg = trg[:,1:].contiguous().view(-1)

            #output = [batch size * trg len - 1, output dim]
            #trg = [batch size * trg len - 1]

            loss = criterion(output, trg)

            epoch_loss += loss.item()

    return epoch_loss / len(iterator)

model.load_state_dict(torch.load('tut6-model.pt'))

test_loss = evaluate(model, test_iterator, criterion)

print(f'| Test Loss: {test_loss:.3f} | Test PPL: {math.exp(test_loss):7.3f} |')
接下来我们就可以实际运行看看翻译过程和翻译结果,下面是我们实际翻译时候的流程
- 将输入的字符串句子进行tokenize操作,主要是将句子变成单词数组
- 加上开始和结束标志<sos> and <eos>
- 将输入进行数字化,将字符转成数字
- 将输入组装成带batch维度的tensor,保持与训练时数据维度一致
- 创建输入数据的mask
- 将输入数据和mask放入到encoder中,得到一个输出
- 创建一个输出的list,第一个位置初始化为开始标志符
- 循环运行decoder,直到到达设置的最大次数
- 将当前输出的list转换成tensor,并添加batch维度,第一次的时候list中只有开始标志
- 创建一个输出目标的mask
- 将当前的输出list,之前encoder的输出,和当前输出的list对应的mask一起放进decoder中
- 获得一个输出单词的预测
- 将上一步获得的一个单词添加进输出list中
- 如果碰到结束标志符,就停止循环
- 将输出list中的数据转换成tokens
- 去掉开始符号,得到输出和attention
def translate_sentence(sentence, src_field, trg_field, model, device, max_len = 50):
model.eval()
if isinstance(sentence, str):
nlp = spacy.load('de_core_news_sm')
tokens = [token.text.lower() for token in nlp(sentence)]
else:
tokens = [token.lower() for token in sentence]
tokens = [src_field.init_token] + tokens + [src_field.eos_token]
src_indexes = [src_field.vocab.stoi[token] for token in tokens]
src_tensor = torch.LongTensor(src_indexes).unsqueeze(0).to(device)
src_mask = model.make_src_mask(src_tensor)
with torch.no_grad():
enc_src = model.encoder(src_tensor, src_mask)
trg_indexes = [trg_field.vocab.stoi[trg_field.init_token]]
for i in range(max_len):
trg_tensor = torch.LongTensor(trg_indexes).unsqueeze(0).to(device)
trg_mask = model.make_trg_mask(trg_tensor)
with torch.no_grad():
output, attention = model.decoder(trg_tensor, enc_src, trg_mask, src_mask)
pred_token = output.argmax(2)[:,-1].item()
trg_indexes.append(pred_token)
if pred_token == trg_field.vocab.stoi[trg_field.eos_token]:
break
trg_tokens = [trg_field.vocab.itos[i] for i in trg_indexes]
return trg_tokens[1:], attention
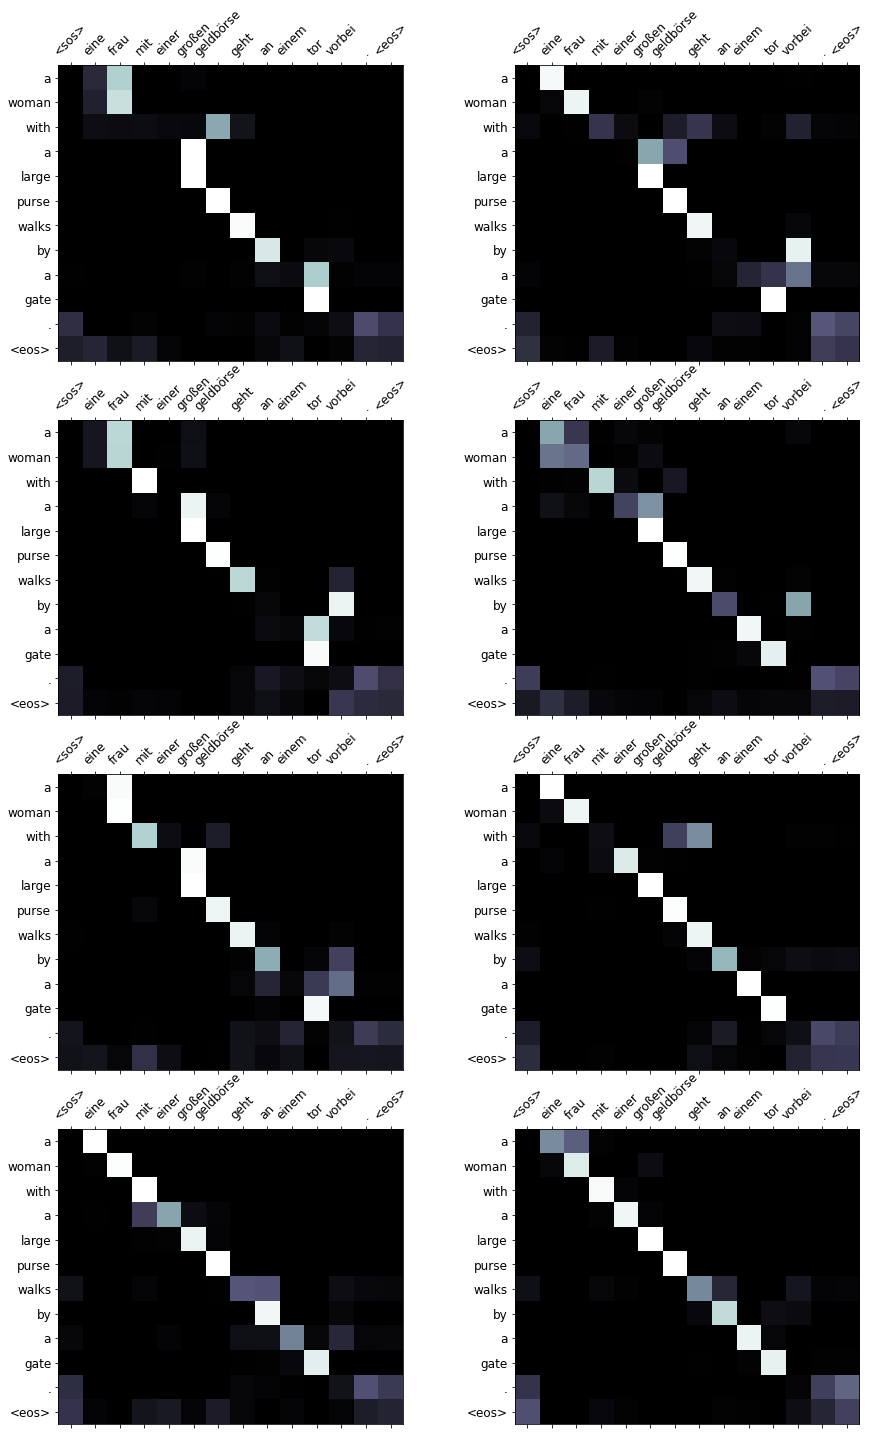
def display_attention(sentence, translation, attention, n_heads = 8, n_rows = 4, n_cols = 2):
assert n_rows * n_cols == n_heads
fig = plt.figure(figsize=(15,25))
for i in range(n_heads):
ax = fig.add_subplot(n_rows, n_cols, i+1)
_attention = attention.squeeze(0)[i].cpu().detach().numpy()
cax = ax.matshow(_attention, cmap='bone')
ax.tick_params(labelsize=12)
ax.set_xticklabels(['']+['<sos>']+[t.lower() for t in sentence]+['<eos>'],
rotation=45)
ax.set_yticklabels(['']+translation)
ax.xaxis.set_major_locator(ticker.MultipleLocator(1))
ax.yaxis.set_major_locator(ticker.MultipleLocator(1))
plt.show()
plt.close()
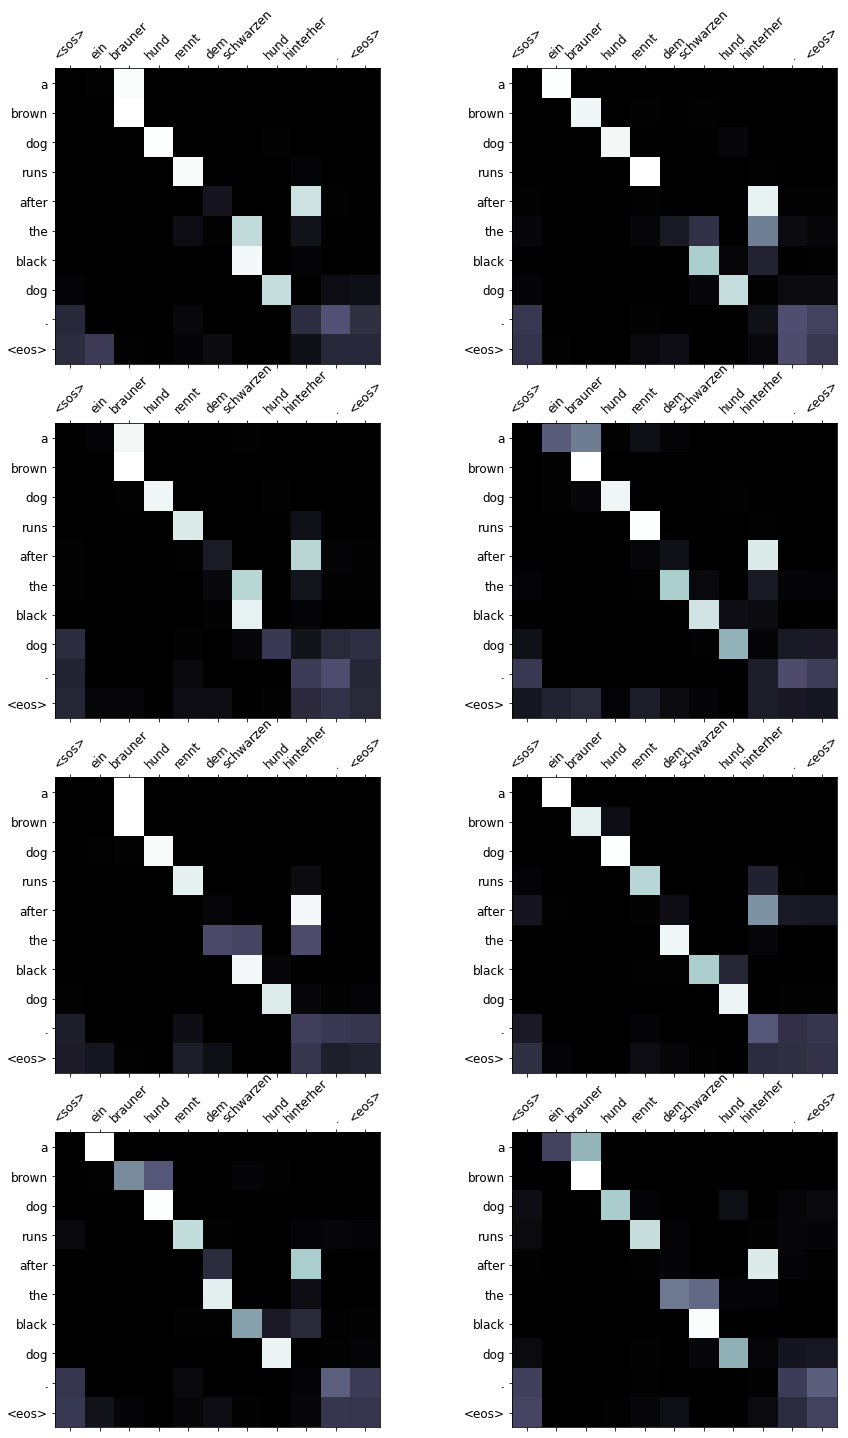
example_idx = 8
src = vars(train_data.examples[example_idx])['src']
trg = vars(train_data.examples[example_idx])['trg']
print(f'src = {src}')
print(f'trg = {trg}')
translation, attention = translate_sentence(src, SRC, TRG, model, device)
print(f'predicted trg = {translation}')
display_attention(src, translation, attention)
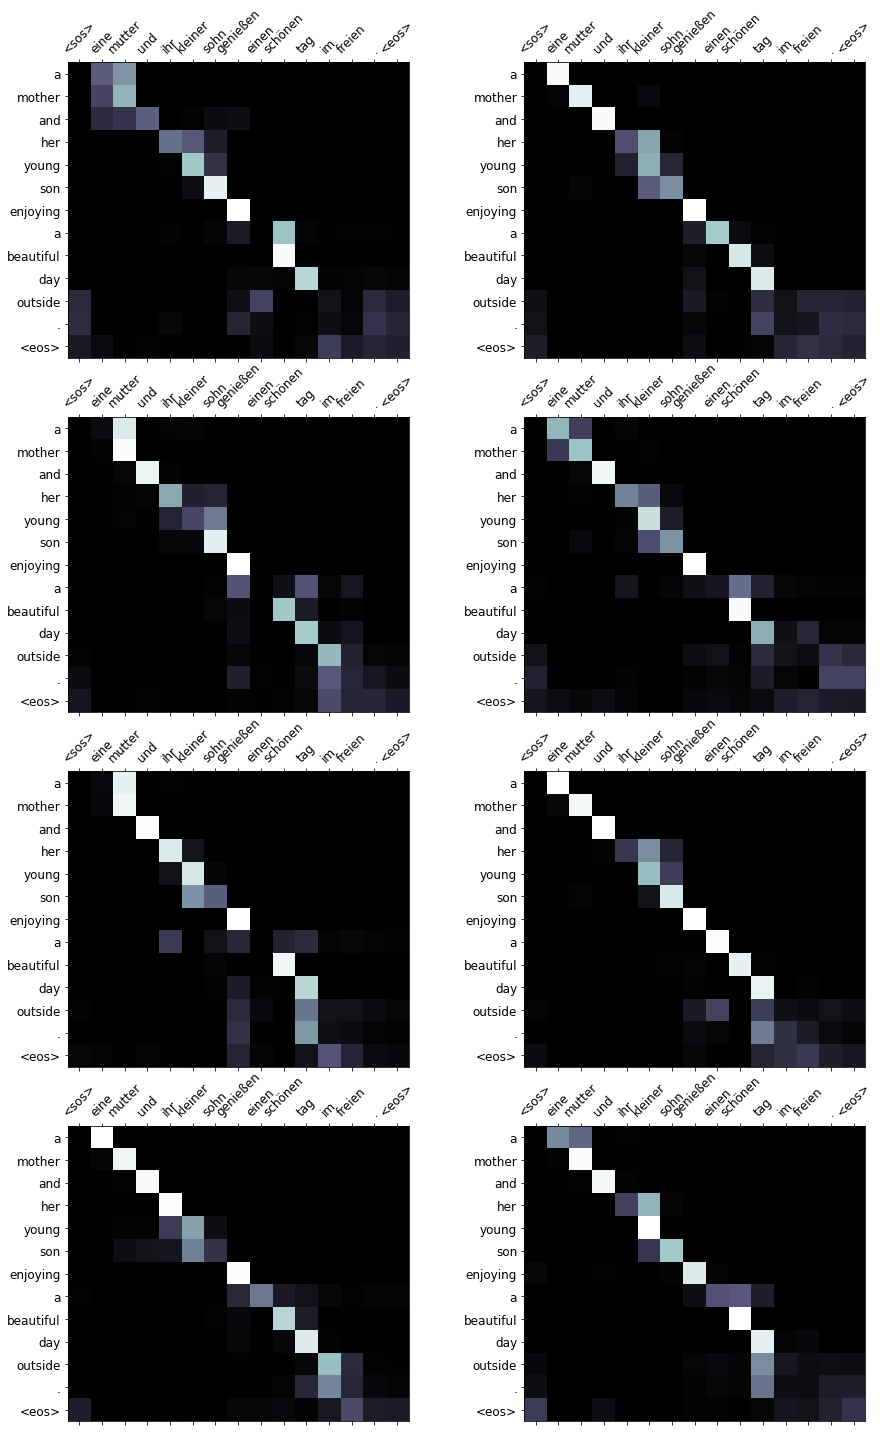
接下来我们再看看在验证集上的attention的效果
example_idx = 6

src = vars(valid_data.examples[example_idx])['src']
trg = vars(valid_data.examples[example_idx])['trg']

print(f'src = {src}')
print(f'trg = {trg}')
translation, attention = translate_sentence(src, SRC, TRG, model, device)

print(f'predicted trg = {translation}')
display_attention(src, translation, attention)
接下来我们再看看在测试集上的attention的效果
example_idx = 10

src = vars(test_data.examples[example_idx])['src']
trg = vars(test_data.examples[example_idx])['trg']

print(f'src = {src}')
print(f'trg = {trg}')
translation, attention = translate_sentence(src, SRC, TRG, model, device)

print(f'predicted trg = {translation}')
display_attention(src, translation, attention)
最后我们通过计算BLUE得分,看看该模型的效果
from torchtext.data.metrics import bleu_score

def calculate_bleu(data, src_field, trg_field, model, device, max_len = 50):

    trgs = []
    pred_trgs = []

    for datum in data:

        src = vars(datum)['src']
        trg = vars(datum)['trg']

        pred_trg, _ = translate_sentence(src, src_field, trg_field, model, device, max_len)

        #cut off <eos> token
        pred_trg = pred_trg[:-1]

        pred_trgs.append(pred_trg)
        trgs.append([trg])

    return bleu_score(pred_trgs, trgs)
bleu_score = calculate_bleu(test_data, SRC, TRG, model, device)

print(f'BLEU score = {bleu_score*100:.2f}')
最终结果为 BLEU score = 36.52
到此transformer的代码部分就介绍完毕。
👉️ 👉️ 👉️ 点击 💝 💝 💝 可以直接下载 Transformer 模型的代码。将代码中 is_train = False 改成 is_train = True 就可以训练了,测试的时候再改回来即可。
本文由 louis 创作,采用 知识共享署名4.0 国际许可协议进行许可
github 地址 https://github.com/7568/7568.github.io
最后编辑时间为:2022-10-28